Overview
Some instructors may require the use of a LockDown Browser and a webcam for online exams. The webcam can be built into your computer or can be the type that plugs in with a USB cable. Respondus LockDown Browser is a secure browser for taking quizzes in eLearning. It prevents you from printing, copying, going to another URL, or accessing other applications during an assessment. If an eLearning quiz requires that LockDown Browser be used, you will not be able to take the quiz with a standard web browser. LockDown Browser should only be used for taking eLearning Quizzes. It should not be used in other areas of eLearning. Watch this short video to get a basic understanding of LockDown Browser and the webcam feature.
System Requirements (Students)
- Windows: 11, 10, and 8. Details
- Mac: macOS 10.12 to 12.0+
- iOS: 11.0+ (iPad only). Must have a compatible LMS integration. Details
- Chromebook: Details
- Web camera (internal or external) & microphone
- A broadband internet connection
Installing LockDown Browser and Taking a Quiz
Follow the link below for instructions on downloading, installing, and taking a quiz with Respondus Lockdown Browser.
Installing and using Respondus LockDown Browser for Canvas quizzes (for students)
Using a Webcam (Respondus Monitor)
You may be required to use LockDown Browser with a webcam, which will record you during an online, non-proctored exam. (The webcam feature is sometimes referred to as “Respondus Monitor.”)
- Your computer must have a functioning webcam and microphone.
- A broadband connection is also required.
- If a quiz requires LockDown Browser and a webcam, follow the steps in the Taking a Quiz section in the link below.
Installing and using Respondus LockDown Browser for Canvas quizzes (for students)
At this point, the Startup Sequence for the webcam begins.
- You will first need to review and agree to the Terms of Use.
- The Webcam Check will confirm that your webcam and microphone are working properly.
- The remaining steps of the Startup Sequence will depend on settings chosen by your instructor.
- Follow the instructions and note your progress along the top of the screen.
- If you encounter a problem, select the It’s not working link for troubleshooting tips and access to 24/7 Live Chat Help.
- The quiz will begin after the Startup Sequence is complete. You cannot exit LockDown Browser until the quiz is submitted for grading.
Finally, when taking an online exam, follow these guidelines:
- Ensure you're in a location where you won't be interrupted
- Turn off all mobile devices, phones, etc.
- Clear your desk of all external materials — books, papers, other computers, or devices
- Remain at your desk or workstation for the duration of the test
- If a webcam is required, make sure it is plugged in or enabled before starting LockDown Browser
- LockDown Browser will prevent you from accessing other websites or applications; you will be unable to exit the test until all questions are completed and submitted
- If a webcam is required, you will be recorded during the test to ensure you're using only permitted resources
Best Practices for Students
Below is a listing of events that may flag the video when you are taking the test as potential misconduct. Please read below and try to avoid:
- Missing from Frame — the student could not be detected in the video frame for a period of time
- Different person in Frame — a different person from whom started the exam may have been detected in the video frame for a period of time
- Multiple persons in Frame — multiple faces are detected in the video for a period of time
- An Internet interruption occurred — a video interruption occurred as a result of an internet failure
- Video frame rate lowered due to quality of internet connection — if a poor upload speed is detected with the internet connection, the frame rate is automatically lowered for the webcam video
- Student exited LockDown Browser early — the student used a manual process to terminate the exam session early; the reason provided by the student is shown
- A webcam was disconnected — the web camera was disconnected from the computing device during the exam
- A webcam was connected — a web camera was connected to the computing device during the exam
- An attempt was made to switch to another screen or application — indicates an application-switching swipe or keystroke combination was attempted
- Video session terminated early — indicates the video session terminated unexpectedly, and that it didn't automatically reconnect before the exam was completed by the student
If you experience a problem in your exam, you may use the "Help Center" button from the toolbar in LockDown Browser:

From the Help Center, you will be able to run a webcam check, a system check, or access the Respondus LockDown Browser Knowledge Base.
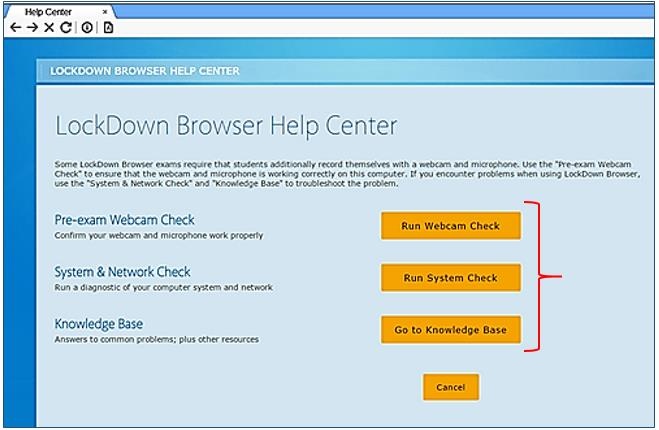
- Select "Run Webcam Check" to ensure the webcam is working properly. (This step can be skipped if you aren't required to record during an exam with a webcam.)
- Return to the main screen in Help Center and select the option "Run System Check".
- When the System Check is complete, a set of images will appear across the top of the screen. A green mark indicates that the item meets the system requirements; a red X may indicate a problem for that item.

- Scroll downward to see detailed results of the network and system check, including bandwidth and latency tests, OS information, a list of applications that are running, etc.
Select "Email results" to send the System Check results to the ITS Help Desk (helpdesk@uwf.edu).
- The ITS Help Desk can review the results that were sent by email. You will receive a copy of the email, as well.
- If the issue cannot be resolved by the ITS Help Desk, it may be escalated to Respondus Support.