You are viewing an old version of this page. View the current version.

Compare with Current View Page History

« Previous Version 6 Next »

Overview

Schedule Planner is a tool designed to assist students with creating an ideal class schedule, taking in to account any other regularly scheduled events or day/time preferences a student may have.

Instructions

Step 1

In MyUWF, search for the Registration Menu App.

Step 2

Once in the Registration Menu, select "Schedule Planner" in the "Student" tab.

\

Step 3

Select the desired term from the drop down menu.

Step 4

A campus can then be selected; multiple or all campuses can also be selected based on preference. 

Once you have indicated your preferred campus locations, click "Save and Continue".

Step 5

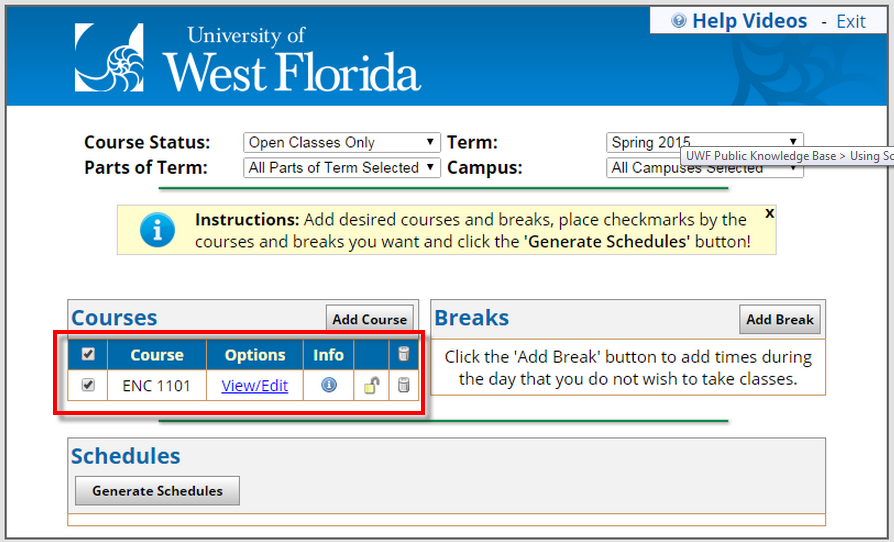
The Schedule Planner home screen should appear.

  • In the top right corner of the page are short Help Videos that provide detailed instructions on how to use Schedule Planner.

Step 6

From the home screen, desired courses can be added by clicking on the "Add Course" option.

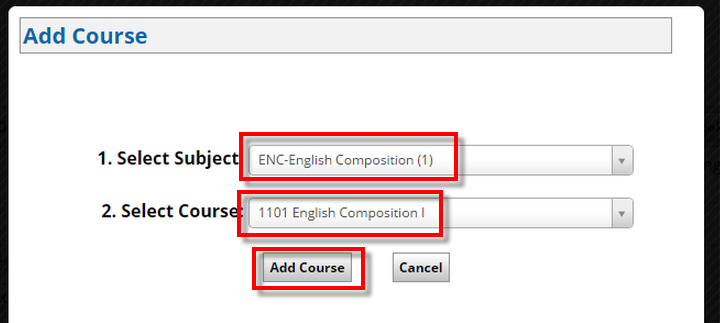
For example, if ENC1101 is the desired course, select the subject code "ENC", and the course number "1101". Then, click "Add Course". This course option will then be added to the "Courses" list.

Step 7

Before generating schedule options, Breaks may be added to the schedule.

  • When breaks are added, Schedule Planner will not show courses that meet during the designated "Break" times.

To add a Break, click on the "Add Break" button. For example, if Practice is MTWR from 3:30-5:30 pm, the time block can be added to the schedule.

  • Breaks can be used for any kind of break needed when creating a schedule (Example: work, practice, meetings, or other regularly scheduled appointments).


You may assign you break a name, then input the Start and End times of the break, as well as choose the appropriate days.


Step 8

Once the Breaks and Courses have been added, clicking "Generate Schedules".

Make sure all desired classes have the box checked next to the course number. This will display all possible options with available classes. Closed classes will not be considered as a schedule option.

Step 9

Once the preferred schedule has been completed, the schedule can be added to the Cart. Click on the View option next to the desired Schedule. Once the next window opens, click on the "Send to Cart" button. This will send the courses to the Registration Cart. Adding classes to your cart will automatically save the selected classes and may be viewed by the adviser.

Step 10

Once ready, click on the "Register" button to register for the listed courses. By adding cl


Notes from 9/29/14 testing: 

- We are working in the "Test 1" instance. Barney is working on cloning PROD, but there are only less than 300 classes right now for Spring 2014. We thought it may be better to just work with Fall classes in Test 1 because it has the most open classes (so that we can actually register in the sections), and focus on cloning Spring when there are more classes to test with. 
- I tested adding my courses and adding breaks. I did this in multiple variations from a freshman perspective (I added classes and a work schedule, then subbed for a greek life meeting, then subbed for a team practice). I then, did a "real life" variation for myself as a graduate student; I put in my Monday through Friday 8-5 pm work schedule, then looked for the on-campus graduate classes. I entered in all the classes that were still needed and offered this semester, and looked for those sections that were open. From there, it created me a lovely evening class schedule very quickly and easily. 
I was then able to register for these graduate classes with no problem. For the undergraduate classes I tried to register for, I received the appropriate restriction errors that should occur. I then checked my schedule both in the TEST SSB instance and the College Scheduler system. It showed the correct classes in both systems. I then dropped a couple classes (as if to change my mind), and it removed them from my schedule and the College Scheduler schedule. But, it keeps them in the Cart. The software will keep all courses selected in the cart, unless the user goes into the "Schedule Planner Registration Cart" and removes them. Otherwise, it will keep them in there, and will re-register the student for those sections consistently. For example, if a student registers for section #1 of ENC1101, and then drops it, but forgets to remove it from their cart, it will give them an error if they try to add another section of ENC1101. They will first need to remove it from their cart (for example, duplicate course error). 
- If a student withdraws from a course, the course will still show in the College Scheduler class schedule section. I did this scenario based on an example from a student that we had last week. If the student withdraws from their M 6-8:45 pm part of term 1 class, and wants to register for a MW 6-7:15 pm part of term 3 class, they will need to first uncheck the class they withdrew from in their current schedule, and make sure the withdrawn class is not in their cart.

(Enter text here)

FAQs

Enter answer here

  • No labels