Overview
| Excerpt |
|---|
This page contains a list of commonly asked questions organized by topic. The list will grow as necessary so check back often. |
FAQs - Browsers
| Expand |
|---|
| title | How do I add someone to my eLearning course? |
|---|
|
To add someone to your course, select the Classlist link from the navigation bar at the top of your eLearning course home page. When the Classlist page opens: - Select the Add Participant icon
 Image Removed at the top of the page. Image Removed at the top of the page. - When the Add Participant window opens, select Add Existing User.
- Type the name or student email address of the person you want to add to your course into the Search for: box, check the fields you are searching (first name, last name, etc.) and then select the “Search ” button.
- All people in the eLearning system with that last name will be now be displayed.
- Find the person you are searching for and check the box to the left of their name and choose the appropriate role from the drop down list
- Click Enroll Selected users
- Now select their appropriate role (e.g., Guest Student, TA, Guest Instructor) in your course by selecting the drop down box arrow to the right of their name and selecting the appropriate role from the list.
- Select the “Enroll” button at the bottom right of the Add Participant window and that person will now have access to your eLearning class.
- If you selected the "Send Enrollment Email" at the top of the page, an email message will be sent to the person notifying them of their enrollment.
Note: Non-registered students in current semester courses MUST be added in as Guest Students as the automatic roster load will remove them when it runs. Faculty cannot enroll a student in the official "Student" role. |
| Expand |
|---|
| title | How do I make my files accessible? |
|---|
|
Creating accessible files is not as daunting a task as many believe it to be. These six steps will go a long way in making your content more accessible.
Provide Alternative Text descriptions (ALT Text) on photos or imagesDO: Solar Eclipse, moon darkening 3/4 of sun leaving a glowing crescentDON'T: Solar Eclipse
How to Add Alt Text in D2LProvide a text equivalent for charts or graphs.Use descriptive text for linksDO: The Library of Congress web site holds a wealth of free resources.DON'T: Click here for a web site holds with wealth of free resources
How to Add Meaningful Links in D2LLimit the use of color text, use only 1 color as a "hightlight" color.Color blind students, and visually impaired students may not see that color as you see it (red may appear olive or grey).Students with cognitive impairments, dyslexia, or other conditions can be confused and distracted by many different colors on a page.Screen readers are not typically set to read the color of text as it disrupts the content flow.
Use the Heading and list features when creating your documents
More information on creating accessible content can be found on the ATC web site at: http://uwf.edu/offices/academic-technology-center/faculty-support-and-resources/accessibility/
Below are links to easy to follow instructions from WebAIM on making various documents accessible (pages will open in a new window).
| Expand |
|---|
| title | How do I copy the content from a previous semester's course or a development shell? |
|---|
|
You will have to copy your course content into your new official course shell. You may copy from a development course master or from a previous semester's course.
Note: If you need to copy content from another instructor's course, you must first be enrolled in that course as an instructor.
Here are the steps: Copy Course Components PDF Guide
Here is a link to the Collaborate session on Copying Course Components https://sas.elluminate.com/site/external/jwsdetect/playback.jnlp?psid=2013-08-14.0956.M.5850FCE9A4C74EED855130EB8B37D5.vcr&sid=uwf0707
- Open your new official course shell and go to "Edit Course" in the upper right corner of the navigation bar.
- On the next screen select the Import/Export/CopyComponents icon/link.
- Leave the default Copy Components from another Org Unit (course) and click Search for offering.
- On this page you may use the Search feature to find a course, or scroll through the pages.
- If the oldest semesters are listed first, click twice on the Semester heading to re-sort by most recent semester.
- Select the radio button next to the course you want to copy from, and then click Add Selected.
- Next, click the button that is labeled Copy All Components if you want everything from the previous course. (See below for instructions on selecting specific items)
- Wait for the copy queue to finish (blue and white bar to the right of the screen
- If everything copied fine, you will see a check in a green circle.
- If there were errors in teh copy, you will see a message and you can view the copy history to see what may have not copied (typically the Calendar)
To select specific items to copy
- If you want to select specific items to copy, click on the Select Components button.
- You may also just check those items you wish to copy, such as the Question Library and/or Quizzes.
- If you only want the Content be sure to also select the Course Files as well.
- Please note that student data WILL NOT be copied over.
- Then click Continue
- On the next screen you can modify your selections to specific items, or just click Finish. This may take a few moments so do not click copy more than onceor you will get multiple copies of your course in your new shell!
- On the next screen you will see a progress icon for each category of content. When you see all green check marks next to your items, click Done
| Expand |
|---|
| title | How do I add someone to my eLearning course? |
|---|
|
Enter answer here |
| Expand |
|---|
| title | How do I add someone to my eLearning course? |
|---|
|
Enter answer here |
| Expand |
|---|
| title | How do I add someone to my eLearning course? |
|---|
|
Enter answer here |
| Expand |
|---|
| title | How do I add someone to my eLearning course? |
|---|
|
Enter answer here |
| Expand |
|---|
| title | How do I add someone to my eLearning course? |
|---|
|
Enter answer here |
| Which Internet Browser Do I Use? |
|
What is a browser?- A browser is a software application used to retrieve and view websites from the Internet.
- While there are many different browsers available, the most widely known are Internet Explorer, and Mozilla Firefox.
While Internet Explorer and Mozilla Firefox are the most widely known, there are others: - Google Chrome
- Safari (Mac)
- Netscape
- Respondus LockDown Browser
- Opera
- SpaceTime
- And many other less known options.
The most important question is: Which Internet browsers have proven to be the most compatible with eLearning (Desire2Learn) and all of the other web based tools we use to develop and implement online instruction? First, there is a difference between “viewing” and “interacting with” online content. For simply viewing online content it really doesn’t matter which browser you use. However, even something as basic as taking a quiz constitutes “interacting” with online content. There are essentially two internet browsers recommended by the UWF Academic Technology Center (ATC) and Information Technology Services (ITS). They are: - Mozilla Firefox, and
- Safari (for Macintosh users)
- Respondus LockDown Browser is a special case.
- It is used to improve the security of the online assessment process.
- The Respondus LockDown Browser is very reliable (for Macs and PCs).
- And, for its stated purpose, is our only option.
Is there any issue with having all three browsers installed and available on my computer at the same time?
eLearning Officially Supported BrowsersWindows| Browser | Status |
|---|
| Internet Explorer 8 | Supported | | Internet Explorer 7 | Supported | | Firefox 3.6 (Preferred) | Supported | | Firefox 3.5 | Supported | | Chrome (newest) | Supported |
Mac OS X| Browser | Status |
|---|
| Firefox 3.6 (preferred) | Supported | | Firefox 3.5 | Supported | | Safari 5.0 | Supported | | Safari 4.0 | Supported | | Safari 3.1 | Supported |
Mobile web| Operating system/browser version | Status |
|---|
| iOS 3 (Safari) | Supported | | iOS 4 (Safari) | Supported | | Android 1.5 | Supported | | Android 2.1 | Supported | | Android 2.2 | Investigation | | Blackberry 6 | Supported |
Where do I get these browsers?- For Mozilla Firefox, go here:
| | - For the Respondus LockDown Browser, go to the eLearning sign-in page (https://elearning.uwf.edu/index.cfm), and select the link to “Respondus LockDown Browser.
- Doing so requires your ArgoNet username and password.
|
|
FAQs - Incomplete Students
| Expand |
|---|
| title | How do I change a student's status to incomplete? |
|---|
|
Instructors must send an email to helpdesk@uwf.edu from their facstaff email account requesting the role change from student to incomplete student. - In the request, the instructor should include the student's name, username, and the course.
- The instructor or student must email helpdesk@uwf.edu once they would like their role changed back from incomplete student to student. This will ensure the course does not show for them indefinitely.
|
FAQs - Respondus Assessment Tool
FAQs - Respondus Monitor
| Expand |
|---|
| title | Why can't my students access an exam that requires Respondus Lockdown Browser and Webcam? |
|---|
|
If your students receive an error message (like the image below) that there is a problem with the settings for an exam that requires the LockDown Browser and Monitor, the instructor needs to login to the course and access the LockDown Browser Dashboard once in a new course to fix the problem. 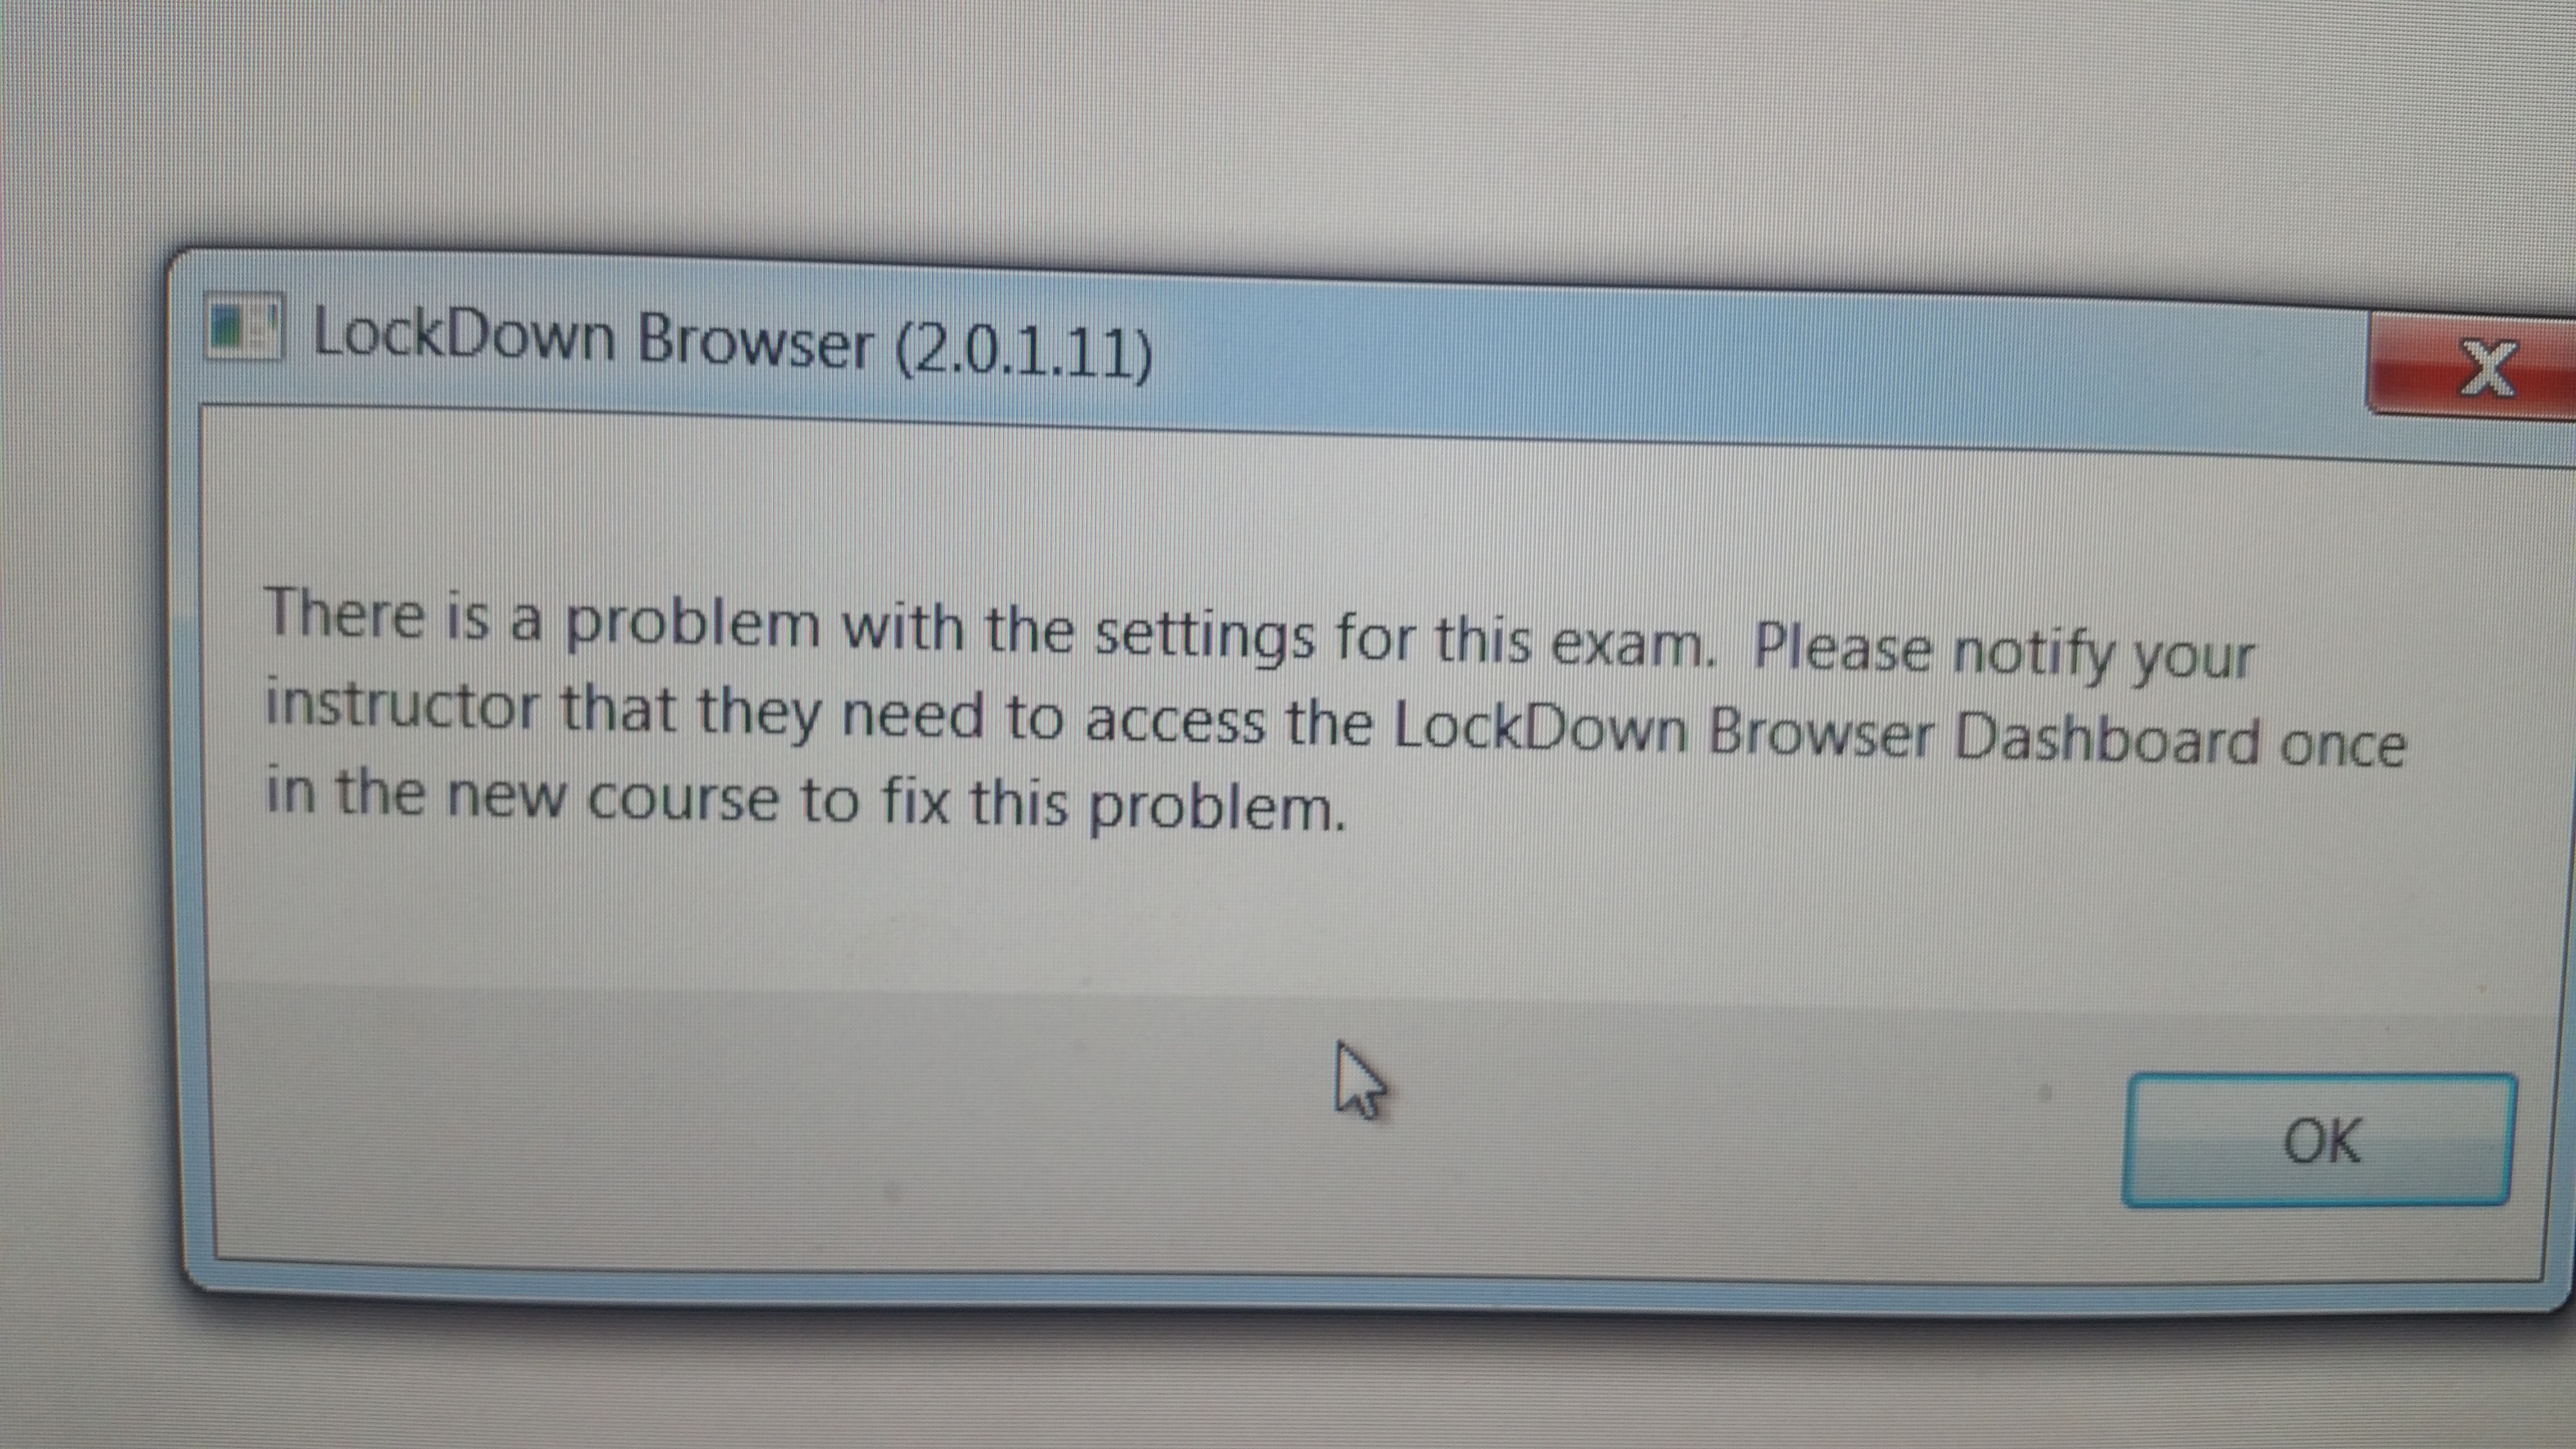 Image Added Image Added
|
| Expand |
|---|
| title | Why is my quiz not showing up in the Respondus Dashboard? |
|---|
|
Sometimes if there is no text in the "Submission Views" "Messages" area, the quiz won't show up in the Respondus Dashboard. The instructor can go into the course and add a space with the space bar and the quiz will show up. Here is the info on the issue: http://bit.ly/2nAR88P
|
FAQs - Syllabus
| Expand |
|---|
| title | How do I upload my Syllabus to the FACS system? |
|---|
|
Follow this link for instructions (may require a login): https://confluence.uwf.edu/x/9ie8 |
FAQs - Classes
| Expand |
|---|
| title | Some of my classes aren't listed. Why? |
|---|
|
Visit the Can't See Your eLearning Course? Confluence page for more details. |
| Expand |
|---|
| title | How do I add someone to my eLearning course? |
|---|
|
Enter answer here |