Overview
Plan Ahead is a tool designed to assist students with creating an ideal class schedule, taking in to account any other regularly scheduled events or day/time preferences a student may have.
Students wishing to register for variable hour courses (Directed Study, Independent Study, Internship, Thesis, Dissertation) should see their Academic Advisor who will complete a Variable Credit Hour Course request.
Undergraduate students wishing to enroll in graduate courses need special permission from the Graduate School Office. Permission is granted in the form of a Level Restriction Override
Registration for non-standard Part of Term courses (Parts of Term 5-9) runs through the 7th day of the month in which the course begins. Any action (add, drop, or withdraw) after that point in time must be submitted to the Office of the Registrar via email
In addition to an Advising PIN, all students are also assigned a Time Ticket which specifies when the student is allowed to register. For additional information on Advising PINs and Time Tickets, please see the Previous/Next Steps section at the bottom of this page.
Courses with "I" (Incomplete) grades will not count as meeting the minimum grade for a prerequisite. (Ex: I have an I grade in ENC 1101, which is a prerequisite for ENC 2000. I will not be able to register for ENC 2000 because the grade of an "I" does not meet the minimum prerequisite grade requirement for ENC 2000.
If you are not currently a UWF student or faculty, please use the public course option found on our website at http://uwf.edu/offices/registrar/registration/course-search/.
Click here for Spring 2019 Using Schedule Planner Instructions
Instructions
Adding courses and Saving a Plan:
Step 1
In MyUWF, search for the Registration Menu App.
Step 2
Select the "Plan Ahead" option
Step 3
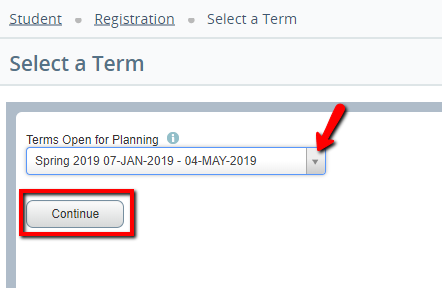
Select the term from the drop down box and click "Continue".
Step 4
Click the "Create a Plan" button to begin a Plan.
Step 5
To view your Degree Works SEP plan, click on the "Degree Works Plans" tab. This will show classes listed on your Degree Works Plan for the selected semester.
Step 6
To find a specific class, click on the "View Sections" option. This will give the option to add a particular section of a course to your plan.
Step 7
In the next window, a listing of available sections will appear. When you are ready to select a specific section, click on the "Add" button.
Step 8
The class will now appear in the Plan box at the bottom right of your screen. To continue selecting classes, click "Return to Plan".
Step 9
When you have finished selecting classes, click on the "Save Plan" button.
Step 10
A pop up Window will appear for the Plan Name. Enter what you would like to call your plan and select "Save".
Removing a Course from a Plan:
Step 1
If you decide to remove a class from your plan, follow Steps 1-3 as mentioned above in the "Add a course and Save a Plan" section.
Step 2
Click on the "Edit" button on the far right of the screen.
Step 3
Click on the drop down box next to the course you wish to remove and select "Delete". Then, click "Save Plan".
Delete Plan:
Step 1
If you decide to remove a class from your plan, follow Steps 1-3 as mentioned above in the "Add a course and Save a Plan" section.
Step 2
Select the "Delete" button. This will delete the plan you have created.
Dropping/Withdrawing from Courses
To drop a course after registration, please follow the instructions for Dropping Courses or Withdrawing After Drop/Add (as applicable), then you will also need to remove the course from your Plan.
Next Steps
Students may also search for courses using the standard instructions for Registering for Courses.


