Overview
The Respondus Test Generator is a tool that faculty can download from the Software icon in the Instructor Resources folder in MyUWF. This tool enables faculty to convert exams from a text format to an eLearning format for uploading. Faculty can also manage and print exams for classroom use. The Respondus Test Generator will also support or convert many publisher test banks for uploading into eLearning. |
Instructions

Downloading Respondus 4.0
- Enter MyUWF, locate the Software tab in the Instructor Resources folder or type Software in the search field. Click on the Software icon and select the Software Downloads link, scroll to Respondus Assessment Tool, and select it (you may have to re-enter your username and password).
- Open and print the file: RS4_Installation_Instructions.txt (you WILL need it).
- Select Download Now. Select the save option and save the file to your desktop. A zipped file (RS4_Download.zip) will appear on your desktop.
- Unzip the file.
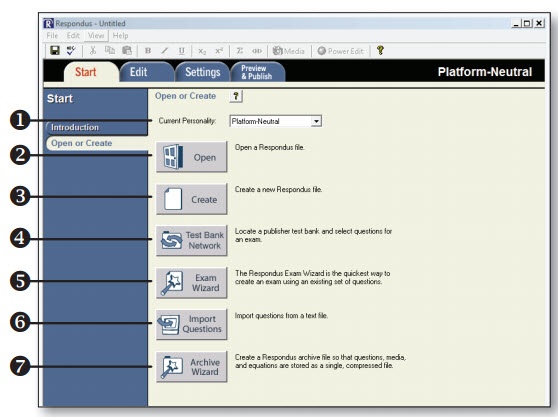
Understanding the Start Menu

- Personality - select the course management system being used with Respondus.
- Open - open an existing Respondus file.
- Create - create a new file.
- Test Bank Network - locate a publisher test bank and select questions for an exam.
- Exam Wizard - create a new exam by copying questions from other Respondus fi les.
- Import Questions - import questions from MS Word, Rich Text, QTI and other formats.
- Archive Wizard - create a zip archive of a Respondus file,including all pictures and media.
Registering a Publishers Test Bank
Thousands of publisher test banks are available in Respondus format (free to instructors who adopt a participating textbook).
- On the Start menu in Respondus, select the Test Bank Network button.
- The first option, “Search for a publisher test bank” will open a browser window and enable you to search for the textbook adopted for your course.
- For the textbook selected, click “More Information” and submit the request form for the test bank.
- The publisher receives the request and will send you the File Code and Password via email within 1-3 days.
- When the File Code and Password is received, start Respondus and return to the Test Bank Network wizard.
- Select the second option, “Register a test bank using a file code and password”.
- Enter the File Code and File Password (if required) provided by the publisher, along with the information requested. This will register the test bank with this copy of Respondus. It won’t be necessary to repeat the process again on this computer.
- Once the test bank is registered, select the third option on the Test Bank Network wizard, “Select questions from one of the following publisher test banks”.
Questions can now be copied from the test bank to the currently open Respondus file.
Using the Exam Wizard
Use the Exam Wizard to create a new exam by copying questions from other Respondus files.
- From the Start menu, select the Exam Wizard.
- Select the first option to Create a new exam and copy questions to it. Click Next.
- Enter a name and description for the new file. Click Next.
- Select the Respondus “source” files from where the exam questions will be copied. Click Next.
- From the pull-down list, select one of the source files from the previous step.
- Select either the Automatic Selection or Manual Selection option and then select questions from the source file.
- Add the selected questions to the list in the lower section by selecting Add to End of List or Insert into List.
- Repeat steps 5 to 7 until the desired questions are selected. Click Next.
- The new file has been created. Choose from the options shown and click Finish.
Importing Questions from Other Formats
Existing questions can be imported from other file formats, such as MS Word.
- From the Start menu, select Import.
- Select the Type of File being imported (MS Word, Rich Text, CSV).
- Make sure that the file to be imported follows these formatting guidelines.
- Browse to and select the file being imported.
- Preview the import results to check for errors, then click Finish to complete the import.
Using the Edit Menu
Use the Edit menu to create or edit questions.
- Select a question type from the tabs along the left.
- Enter the question text in the question template.
- Add formatting to the question text using the toolbar options.
- Specify the correct answer (if applicable) and the point value.
- Click the Preview butt on to preview the question.
- When ready, click the Add to End of List or Insert into List button.
- The question will appear in the Question List at the bottom of the screen.
The Edit Toolbar
The Edit Toolbar provides tools for formatting text or adding equations, tables, images and other media.

- Save File - save the currently open file.
- Spell checker - spell check the file.
- Cut, Copy and Paste - copy text to/from a text entry field.
- Bold, Italic, Underline - add bold, italic or underline formatting.
- Superscript and Subscript - add superscript or subscript formatting.
- Equation Editor - launches the equation editor.
- HTML Editor - add a block of HTML to a question.
- Media Wizard - add images, audio, video, and other files; embed files from other servers (e.g. YouTube, Picasa).
- Power Edit - provides a larger edit window and includes other tools like bulleted lists, fonts, table editor, etc.
The Settings Menu
The Settings menu displays the exam settings available for the course management system (CMS) that was selected on the Start menu (Desire2Learn). However, we recommend that you import your question bank into the Question Library in D2L and then create your quiz and set your quiz properties, because all settings may not import correctly.
The Publish Menu - How to get your Respondus file into eLearning
There are numerous sets of Respondus 4.0 instructions "floating" around on the Internet and elsewhere.
Some of these instructions would have you believe that you can use Respondus 4.0 to publish your exam or test bank directly into your course in eLearning.
You can not.
The following instructions will walk you through the process of creating a file that you can import into your course in eLearning.
On your desktop you should now see the Respondus icon:  , select it. This will open Respondus 4.0.
Select the Open or Create tab in the left column. Then, select the Import Questions icon.
Select the "Type of file:" In this case it should be a Word file (.doc, .docx, or possibly .txt).
- Use the Browse button to find your question file.
- In step 2, select "Create a new document, named" (give it a simple, short, but meaningful name (i.e., quiz-1)).
- You must select the "Preview" button.
- Don't worry about the questions at this point.
- If needed, you can easily edit them later in Respondus 4.0.
- Now, select "Finish."
- "File Saved" select OK.
- Now, select the "Preview & Publish" tab.
- ATC recommends selecting the "Preview the File" tab.
- This will allow you to review each question.
- If the question is good, move to the next question with the "Next >>" button.
- If the question needs modification, select "Modify Item," and make the necessary changes.
- Then select "Save Changes," and move to the next question.
- HINT:
- Generally, (if you have a lot of questions)
- If you properly formatted your questions (if you didn't you wouldn't have gotten this far).
- And, the first few questions look good, they're probably all good.
- Move on!
- Close the "Preview" window.
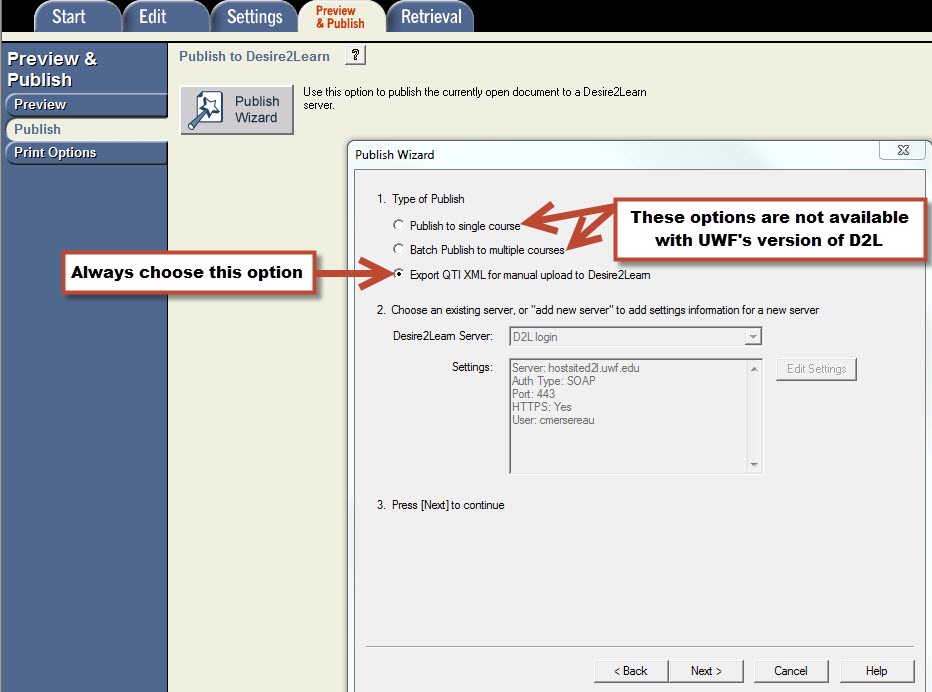
- Now, Select the "Preview & Publish" tab, and then select the "Publish" option in the left column.
- Select the "Publish Wizard" button.
The rest is very important! - Type of Publish:
- Select: Export QTI XML for manual upload to Desire2Learn.

- Select the "Next" tab.
- Assessment type: Select "Question Library Section";
- Select "Save As"
- The file name is there (i.e., quiz-1); just ensure that you save the file to a place where you can find it later!
- Select "Save"
- Select "OK"
- Select "Finish"
- You're almost done!
- Close the Respondus 4.0 program.
- Find the file you created (it's actually a "zipped" folder).
- It should be where you saved it, AND it is a Zip file (i.e., quiz-1.zip).
- ALSO, right next to the Zip file is a text file with the same name (i.e., quiz-1.txt).
- Open and print the text file.
- Follow the instructions in the text file exactly as written.
- All of your questions are now in the question library of your course.
- Now you can create your quizzes by importing your questions from the question library!
Printing an Exam
- From the Preview & Publish menu, select the Print Options tab.
- Select an option: Exam or Exam with Answer Key or Answer Key only. Click the Settings button to the right to further adjust the settings.
- Click the Edit Headers button to modify the text that will appear at the top of each page.
- To print multiple variations of the exam (with randomized question orders in each), change the pull-down list to the desired number of exam variations.
- Click the Print Preview button to display the exam output in a window.
- Click the Save to File button to save the exam to MS Word, Rich Text Format or Text format. Or, click the Send to Printer button to print the exam directly.
FAQs
Use an expand section for each FAQ that you want to include. Copy and paste the expand section to create a new question. Make sure to edit the title of the expand section. Please remove this section if there are no FAQs.


 , select it. This will open Respondus 4.0.