| Expand | ||||
|---|---|---|---|---|
| ||||
Identify the requirements for an internet connectionTo succeed in this program, you will need a broadband internet connection. These classes require large files to be downloaded and uploaded. Due to the amount of data and the need to connect to a virtual desktop, it is not recommended to try and complete classes over a dial-up or 3G/4G/5G connection. You'll want a connection speed of at least 5 Mbps or higher for this program. Cable or Fiber is recommended, but if you can download music or stream videos, you'll probably be ok, but it can vary from connection to connection. For more information, contact your local service provider such as AT&T, Cox Cable, Mediacom, Dish, DirecTv, etc. Watch the video from GCFLearnFree.org to learn more about internet connections.
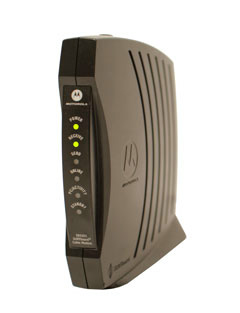
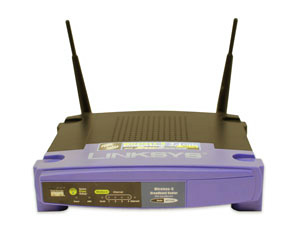
Hardware neededIf you have a computer, you're almost ready to connect to the internet. Most service providers include a modem (often for a fee) when you establish service. You also have the option of purchasing your own modem if you want a better or cheaper model. If you find that your connection is slower than it should be and your modem and internet cables are several (around 5 or more) years old, you might want to consider replacing them. Just like with computers, phones and TVs, modems get old and perform more slowly and get replaced by new technology. Optionally, you can have a router to complete your home network. Some modems come with a built in router, which might be called a gateway by your service provider, but if not, you may want to consider purchasing one. A router will allow you to connect several computers and other devices (such as phones, tablets, smart TVs, gaming consoles, etc) to a single internet connection via a wireless, or Wi-Fi, network. Sometimes, if you have a large or multistory house, you might need to purchase a WiFi extender if you notice poor signal in rooms that might be far from your router.
Modem Router |
| Expand | ||||||||
|---|---|---|---|---|---|---|---|---|
| ||||||||
Download and save files
If you would like to practice downloading a file, download the PDF below. Zipping and unzipping compressed filesGIS and remote sensing data are often very large files, so there are ways to compress these files to easily group, organize, move, or share them. While there are many different compression file types seen in GIS, a common compression file type seen in all areas of information technology is the .zip. Please review the Working with zip files tutorial from GCFLearnFree.org to learn more about working with compressed files. Uploading filesOur GIS classes will require files to be uploaded to the internet and cloud services via submission through Canvas Learning Management System as well as file uploading files to Google Drive. Watch the videos from Canvas LMS and GCFLearnFree.org to learn more about uploading files.
|
| Expand | ||||||||
|---|---|---|---|---|---|---|---|---|
| ||||||||
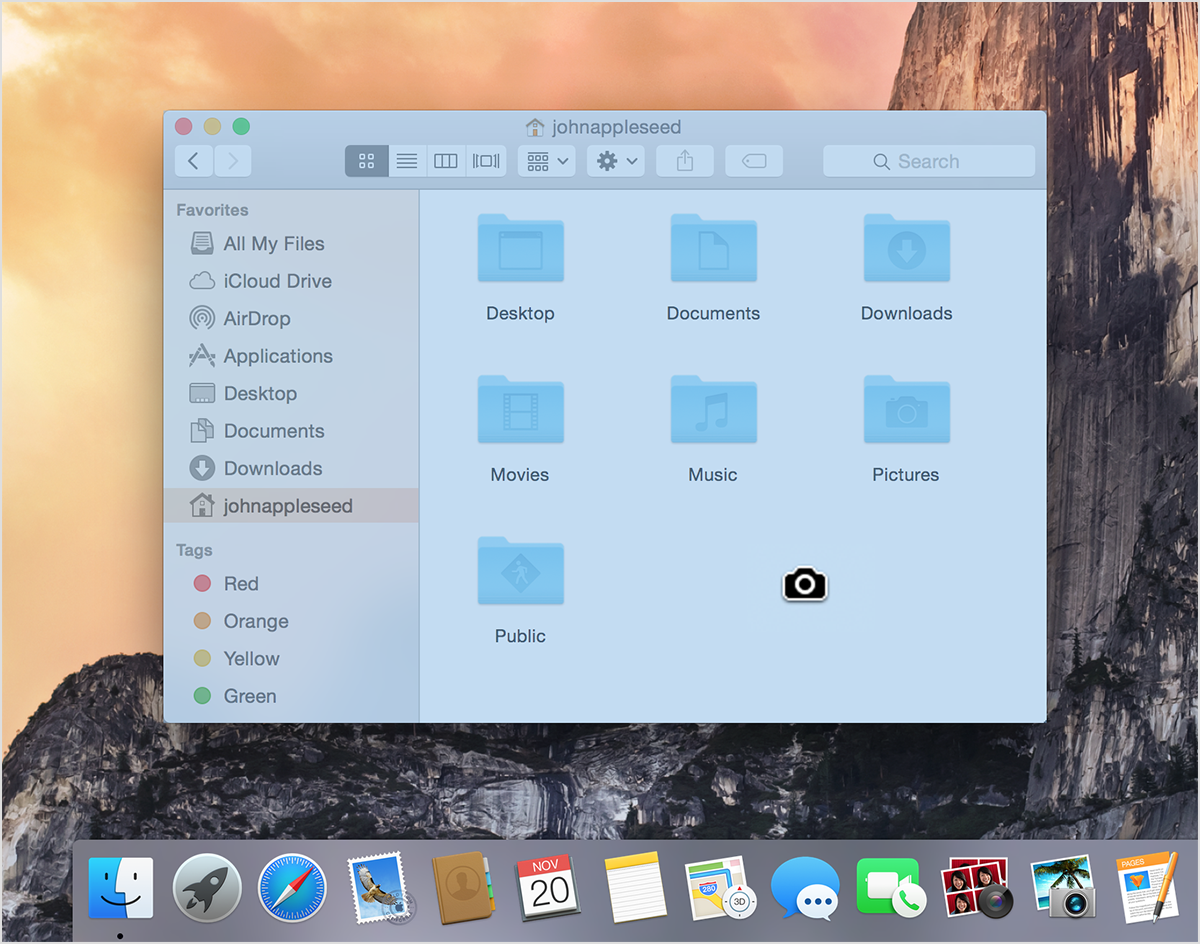
Managing file and foldersA successful geographic information system application or map should involve various layers and data. This means proper organization of the files behind these layers and data is a must. This applies to files saved to a local drive on the computer or a network or cloud drive like Google Drive. Watch the videos from GCFLearnFree.org to learn more about managing files and folders.
|
| Expand | ||
|---|---|---|
| ||
Resize windows and navigate among multiple windowsHow to Resize a Window
Before a window can be resized, make sure it is not maximized. A maximized window cannot be resized. If the window is maximized, click the Maximize / Resize button, as shown in the example below. Also, keep in mind that not every window can be resized.
Moving a window using the mouse
Once a window has been resized so it is not fullscreen, it can be moved anywhere by clicking and holding the left mouse button down on the title bar and then dragging it to where you want it displayed. Below is a visual example showing how this is accomplished. When clicking the title bar at the top of the window try to click on an empty portion of the title bar or the title of the window. Other buttons that may be on the window like the minimize, maximize, and close will perform the action of those buttons. Managing and snapping multiple windowsThe snapping features built into Windows 10 & 11 allow for windows to be easily organized on screen. Please review the tips for managing multiple windows tutorial from GCFLearnFree.org to learn more about snapping windows on screen. |


| Expand | ||||
|---|---|---|---|---|
| ||||
Troubleshoot peripherals: i.e. camera, microphone and speakersSometimes, a computer and extra devices like a webcam, microphone, or speakers will not work well together the first time. If this occurs, you can try troubleshooting. Some basic steps to do so are below. For more specific help, read the user guides that came with your device or do a Google search such as “Troubleshoot microphone windows 10”.
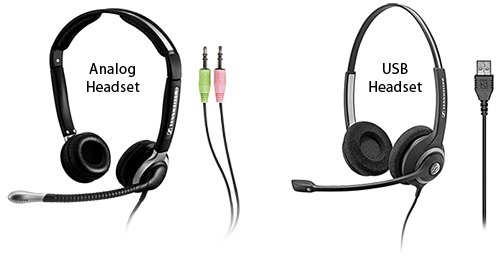
It is recommended to at least have a headset for your GIS classes so that you can participate more effectively in online office hours.
Instant messaging and video chatVirtual office hours are conducted online through Google Meet or Zoom. See your syllabus to determine which method your instructor will use. Virtual office hours offer the opportunity for an entire class to meet at a scheduled time to speak with the instructor. Participants can communicate there through instant messages, voice chat, webcam, and screenshare. As long as you are familiar with the basics of instant messaging and video chat, you will be able to navigate these programs. Your student email account is a google product, so you automatically have access to Google Hangouts to message and video chat. IM, short for Instant Message, allows people to send text messages to each other instantly via the internet. This differs from texting, which happens primarily via your phone, although you can download apps such as Skype, Google Hangout, or Facebook Messenger to IM someone. When instant messaging, you typically need to have an account with the same service as the person you want to talk to. In other words, you can't talk to someone on Skype from Google Hangout. IM differs from email in that the message is sent instantly, and typically when the person is online. With email, you have to wait for the person to check to see if they have new messages, but emails are good for longer, more detailed messages and sending files. IMs also tend to be shorter messages than email. With video chat, you are able to actually see the person you are talking to and can communicate by speaking rather than typing. However, depending on your internet connection the video connection may be slow, choppy, or might not work. To video chat, you need a webcam. These might be built in to your computer or might need to be purchased separately. Depending on your messaging service, you might also be able to use a phone as a webcam via a messaging app downloaded on your phone. It is also possible to join a video chat with just a microphone, and your image will not be displayed. Both IM and video chat can be between two or more people, depending on your service. When video chatting, be sure to be aware of your surroundings and appearance. The video below will cover some common Do's and Don'ts of video chatting.
|
| Expand | |||||||||
|---|---|---|---|---|---|---|---|---|---|
| |||||||||
Taking a screenshot in Windows
Taking a screenshot is simple, regardless of which version of Windows you’re running. There are only a few steps — assuming you haven’t fiddled with the default keyboard controls — and you should already have access to all the image-editing software you need.
Taking a screenshot in MacOSYou can capture your entire screen or just a selected portion of it. The screenshot is automatically saved to your desktop. Using Keyboard Shortcuts to take a screenshot of your entire screen
Using Keyboard Shortcuts to take a screenshot of a selected portion of your screen
Using Keyboard Shortcuts to take a screenshot of a window
|

Questions and Comments?
If you have questions regarding the content on this page, help is easy to find. Simply contact the GIS Office via phone (850-474-2648) or email (geo@uwf.edu).
Your questions will be answered as quickly as possible.
| Expand | ||||
|---|---|---|---|---|
| ||||
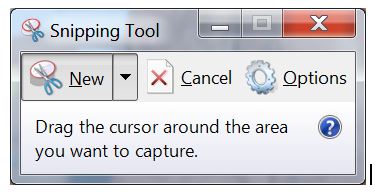
Using Windows Snipping ToolSometimes the easiest way to make a copy of something is to take a snapshot of your screen—this is what Snipping Tool does.
Capture all or part of your PC screen, add notes, save the snip, or email it from the Snipping Tool window. You can capture any of the following types of snips:
After you capture a snip, it's automatically copied to the Snipping Tool window. From there you can annotate, save, or share the snip. The following procedures show how to use Snipping Tool.
Using Windows Snip & Sketch
Snip & Sketch is the modern version of the Snipping Tool. You are likely to find Snip & Sketch on new or fully updated versions of Windows. The basic functions are the same, but Snip & Sketch offers some updated ways to edit your screenshots with drawing, highlighting, etc.
|

| Expand | ||||||||||||
|---|---|---|---|---|---|---|---|---|---|---|---|---|
| ||||||||||||
Messaging and Video ChatVirtual office hours are conducted online through Google Meet or Zoom. See your syllabus to determine which method your instructor will use. Virtual office hours offer the opportunity for an entire class to meet at a scheduled time to speak with the instructor. Participants can communicate there through instant messages, voice chat, webcam, and screenshare. As long as you are familiar with the basics of instant messaging and video chat, you will be able to navigate these programs. Your student email account is a google product, so you automatically have access to Google Meet to message and video chat. IM, short for Instant Message, allows people to send text messages to each other instantly via the internet. This differs from texting, which happens primarily via your phone, although you can download apps such as Skype, Google Hangout, or Facebook Messenger to IM someone. When instant messaging, you typically need to have an account with the same service as the person you want to talk to. In other words, you can't talk to someone on Skype from Google Meet. IM differs from email in that the message is sent instantly, and typically when the person is online. With email, you have to wait for the person to check to see if they have new messages, but emails are good for longer, more detailed messages and sending files. IMs also tend to be shorter messages than email. With video chat, you are able to actually see the person you are talking to and can communicate by speaking rather than typing. However, depending on your internet connection the video connection may be slow, choppy, or might not work. To video chat, you need a webcam. These might be built in to your computer or might need to be purchased separately. Depending on your messaging service, you might also be able to use a phone as a webcam via a messaging app downloaded on your phone. It is also possible to join a video chat with just a microphone, and your image will not be displayed. 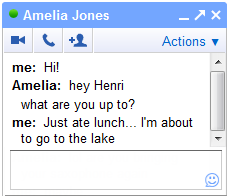 Both IM and video chat can be between two or more people, depending on your service. When video chatting, be sure to be aware of your surroundings and appearance. Please review the video below from Omega Digital Technologies that will cover some common Do's and Don'ts of video chatting.
For additional information regarding video conferencing software and services, please review these videos from GCFLearnFree.org.
|
| Expand | ||
|---|---|---|
| ||
Our assignments are typically delivered in .pdf file format. This document type allows for us to easily update text, graphics, and images within the lab assignments and share them. Please review the What is a PDF tutorial from GCFLearnFree.org to learn more about working with .pdf files. |
| Expand | ||||||||||||
|---|---|---|---|---|---|---|---|---|---|---|---|---|
| ||||||||||||
Microsoft Office will be used throughout our GIS programs. MS Word will be used to answer questions for laboratory assignments, MS Excel will be used to manage and analyze data, and MS PowerPoint is a means to execute or deliver a presentations that will be required in some courses. It its imperative to be able to understand and execute the fundamentals of these programs prior to enrolling in our GIS programs. Watch the videos from GCFLearnFree.org to learn more about Microsoft Office applications.
|
| Expand | ||
|---|---|---|
| ||
As GIS projects and data tend to be rather cumbersome with large files, it may be necessary to archive older projects or work from the Google Drive cloud service for additional storage space. There is the option to use the Google Drive application as a storage solution. |
| Hide If | ||
|---|---|---|
| ||
To review the required skills and more in more detail feel free to access the following: |
| Expand | ||||
|---|---|---|---|---|
| ||||
Web BrowserOnce you are connected to the internet, you can access websites using a web browser. A web browser allows you to connect to and view websites. It is not the internet itself, but displays pages on the internet. Each website has a unique address called a URL. Typing a URL into a browser will allow you to connect to the website and your browser will display it. Websites often contain links to other pages on their site or other websites. These links are called hyperlinks and show up in the text or sidebars of webpages. They may appear a different color than the rest of the text, or may be bold, underlined, or italicized. Clicking a link will cause the URL to change in the address bar or open a new window or tab. A tab appears in browsers that support tabbed browsing. This allows the user to browse multiple pages in a single window. Watch this video from GCFLearnFree.org to learn more about web browsers.
|

| Expand | ||
|---|---|---|
| ||
| There are several different types of browsers and most people have a favorite they use. The most common browsers are Chrome, Firefox, Safari, and Edge. Each browser is designed by a different company and comes with their pros and cons. Different computers will come with different browsers set as the default. If you would like to change the default, search your computer for default settings, navigate to Web Browser, and then select your preferred browser. |
| Expand | ||||||||||||||||
|---|---|---|---|---|---|---|---|---|---|---|---|---|---|---|---|---|
| ||||||||||||||||
Save Favorite WebsitesA bookmark, or favorite, is a method of saving a web page's address. These can be saved to the main bookmark bar or to a bookmark folder on your browser. While taking GIS classes, you will find it helpful to bookmark certain websites that you visit often such as eLearning, MyUWF, Gmail, ESRI Help, etc. View the video for your preferred browser on how to bookmark websites. On most browsers, Ctrl + D will bookmark a page. Watch these videos from GCFLearnFree.org to learn how to favorite and bookmark in the previously mentioned browsers.
|
| Expand | ||||
|---|---|---|---|---|
| ||||
Effectively find information using keywords and search enginesBeing able to search for information online is one of the most important skills you can have. In GIS you will often have to perform searches for help topics or data, even after you leave the classroom. Knowing how to find information effectively will take you a long way in your GIS career. Searches can be performed across the internet by using a search engine such as Google or Bing. Specific websites may also have search boxes to help you find topics or keywords on that website only. For example, if you were to visit the GIS Dictionary, and enter into the search bar "raster", this website would take you to their page containing the raster entry rather than making you manually navigate to the R page and scroll until you find raster, then click the link to take you to the page. Searches also do not need to be complete sentences. On Google, you don't need to type What is the definition of a raster? Instead, you just need to search raster definition. However, this search does not seem to bring us any GIS related results, only television. So, if we search raster definition -television, this will bring us back all the raster definitions not relating to television. These results seem to deal mainly with graphic design though, rather than GIS. To get results specifically for GIS then, lets change the search to raster definition "gis". As you can see, this brings back the results we were trying to get to. Instead of showing us all the definitions of a raster like the first search, it shows us only the web pages that contain a raster definition and the specific phrase "gis". Watch this video from GCFLearnFree.org to learn more about using search engines.
Again, being able to find information online is a key skill both as a student and later as a GIS professional. If you want to learn more about searching online, and evaluating if your search result is credible, please visit GCF's Using Search Engines and Search Better tutorials. |
| Expand | ||||||||||||||||||||||
|---|---|---|---|---|---|---|---|---|---|---|---|---|---|---|---|---|---|---|---|---|---|---|
| ||||||||||||||||||||||
How email worksEmail is an important method of communicating in this day and age. It sends messages instantly from one person to another and can send large files that would otherwise need to be mailed or delivered in person. As a student of UWF, you now have a student email address. This is how the university, your professors, and your peers will primarily communicate with you during your time here. You should use your student email for all university and class related communications rather than your personal one. An email address contains two parts. A user name and an email provider. abc123@students.uwf.edu The user name is your unique identifier. At UWF, this is typically your first two or three initials followed by 1-3 randomly generated numbers. The email provider is who is providing the email service. You are probably used to seeing providers such as Gmail, Hotmail, or yahoo. The UWF email system is supported by Google's Gmail. It is important when sending an email to make sure you get the address completely correct. If you send an email abc123@student.uwf.edu (forgetting the s at the end of students), it won't send. Gmail will be able to help you through by being able to autofill most UWF email addresses from it's internal directory. You still have to be careful though. There might be two people with the same name. If that happens, make sure to verify the address of the person you are emailing to make sure your message gets to where it needs to go. If you would like to learn more about how to navigate in Gmail, view Google's Help or view GCF Learn Free's Gmail tutorial. Sending an email When you want to write a new email, you start by clicking the compose button on the left side of the screen. This opens a new compose window in the bottom corner of your window. Here, you add the recipients, the subject, the body, and any attachments. When you are done writing, hit send.
Watch this video from GCFLearnFree.org to learn more about using sending emails in Gmail.
Replying to an emailAny new email you receive will go to your inbox. Unread emails will appear to be bold and you can see the name of the sender, the subject, and the first couple of words. When you are ready to read an email, click it and the email will open. Clicking the down arrow next to 'me' will give you more details about the email. You can use arrows on the right side to navigate though emails. When you are ready to go back to your inbox, just click inbox. In Gmail, replying to an email is extremely easy. You just click in the response box and begin typing. You also can choose exactly how you want to respond.
You can also add or remove recipients and edit the subject line. When your done composing your reply, hit send. Watch this video from GCFLearnFree.org to learn more about using replying to emails in Gmail.
AttachmentsMany times you will need to attach a file to an email. In Gmail, there are two ways to do this. First is to attach via the paper clip icon in the compose window. This opens up a file browser where you navigate to where the file is saved on your computer to attach it. The second method is to attach a Google Drive file. Make sure that your Google drive file is correctly shared though. If it isn't, you should get a warning with an option to change sharing permission when you hit send, but it's always good to verify first. Also, if you have very large files that you attempt to attach via the paperclip, Gmail will automatically upload it to Google Drive and attach it that way. Finally, it's always good to give your recipient a heads up that you've attached something and what it is. When you get an attachment, the email will show up in the inbox with a paperclip next to it. Many attached files can be viewed in the browser window. You also have the option to download files or open them with Google Drive. Only open files from trusted sources. If you don't know the sender or why someone is sending an attachment, it is safest not to open it. Identify correct email etiquetteCommunicating online can be difficult. Most communication occurs through what we write, and it's easy for someone to misinterpret what you write without the audio and visual cues that occur during normal face to face conversation. Nettiquite needs to be practiced not only in your email communication, but on the discussion boards as well. A good rule of thumb is to not send or post anything when you are angry or upset. Following these tips will help you avoid common errors.
|
| Expand | ||||||||||||
|---|---|---|---|---|---|---|---|---|---|---|---|---|
| ||||||||||||
Messaging and Video ChatVirtual office hours are conducted online through Google Meet or Zoom. See your syllabus to determine which method your instructor will use. Virtual office hours offer the opportunity for an entire class to meet at a scheduled time to speak with the instructor. Participants can communicate there through instant messages, voice chat, webcam, and screenshare. As long as you are familiar with the basics of instant messaging and video chat, you will be able to navigate these programs. Your student email account is a google product, so you automatically have access to Google Meet to message and video chat. IM, short for Instant Message, allows people to send text messages to each other instantly via the internet. This differs from texting, which happens primarily via your phone, although you can download apps such as Skype, Google Hangout, or Facebook Messenger to IM someone. When instant messaging, you typically need to have an account with the same service as the person you want to talk to. In other words, you can't talk to someone on Skype from Google Meet. IM differs from email in that the message is sent instantly, and typically when the person is online. With email, you have to wait for the person to check to see if they have new messages, but emails are good for longer, more detailed messages and sending files. IMs also tend to be shorter messages than email. With video chat, you are able to actually see the person you are talking to and can communicate by speaking rather than typing. However, depending on your internet connection the video connection may be slow, choppy, or might not work. To video chat, you need a webcam. These might be built in to your computer or might need to be purchased separately. Depending on your messaging service, you might also be able to use a phone as a webcam via a messaging app downloaded on your phone. It is also possible to join a video chat with just a microphone, and your image will not be displayed.
Both IM and video chat can be between two or more people, depending on your service. When video chatting, be sure to be aware of your surroundings and appearance. Please review the video below from Omega Digital Technologies that will cover some common Do's and Don'ts of video chatting.
For additional information regarding video conferencing, please review these videos from GCFLearnFree.org.
|
| Expand | ||||||||
|---|---|---|---|---|---|---|---|---|
| ||||||||
As GIS projects and data tend to be rather cumbersome with large files, it may be necessary to archive older projects or work from the Google Drive cloud service for additional storage space. For additional information regarding browser based Google Drive, please review these videos from GCFLearnFree.org.
|