Overview
| Excerpt |
|---|
This page contains a list of commonly asked questions organized by topic. The list will grow as necessary so check back often. |
FAQs - Browsers
| Expand | |||||||||||||||||||||||||||||||||||||||||
|---|---|---|---|---|---|---|---|---|---|---|---|---|---|---|---|---|---|---|---|---|---|---|---|---|---|---|---|---|---|---|---|---|---|---|---|---|---|---|---|---|---|
| |||||||||||||||||||||||||||||||||||||||||
What is a browser?
While Internet Explorer and Mozilla Firefox are the most widely known, there are others:
The most important question is: Which Internet browsers have proven to be the most compatible with eLearning (Desire2Learn) and all of the other web based tools we use to develop and implement online instruction? First, there is a difference between “viewing” and “interacting with” online content. For simply viewing online content it really doesn’t matter which browser you use. However, even something as basic as taking a quiz constitutes “interacting” with online content. There are essentially two internet browsers recommended by the UWF Academic Technology Center (ATC) and Information Technology Services (ITS). They are:
Is there any issue with having all three browsers installed and available on my computer at the same time?
elearning Officially Supported BrowsersWindows
Mac OS X
Mobile web
Where do I get these browsers?
|
FAQs - Classlist
| Expand | ||
|---|---|---|
| ||
To add someone to your course, select the Classlist link from the navigation bar at the top of your eLearning course home page. When the Classlist page opens:
Note: Non-registered students in current semester courses MUST be added in as Guest Students as the automatic roster load will remove them when it runs. Faculty cannot enroll a student in the official "Student" role. |

| Expand | ||
|---|---|---|
| ||
Instructors will no longer be able to un-enroll persons with a student role from an eLearning course. The only reason an instructor should need to do this is to re-enroll the person as an incomplete student. Please see the new process for changing a person's role from student to incomplete student in an eLearning course.
|
FAQs - Content
| Expand | ||
|---|---|---|
| ||
You will have to copy your course content into your new official course shell. You may copy from a development course master or from a previous semester's course. Note: If you need to copy content from another instructor's course, you must first be enrolled in that course as an instructor. Here are the steps: Copy Course Components PDF Guide Here is a link to the Collaborate session on Copying Course Components https://sas.elluminate.com/site/external/jwsdetect/playback.jnlp?psid=2013-08-14.0956.M.5850FCE9A4C74EED855130EB8B37D5.vcr&sid=uwf0707
To select specific items to copy
|
| Expand | ||
|---|---|---|
| ||
Watch the YouTube Video: Inserting a row or column into a table in eLearning (D2L) |
| Expand | ||
|---|---|---|
| ||
1. Place your cursor in the location within the text box where you want to place the link.
2. Click the Insert Quicklink icon.
3. Select the type of content within your course you want to link to. If you want to link to a website outside of eLearning, select URL.
4. Select the specific item within your course you want to link to. If you selected URL, enter the website’s address in the “URL” field. 5. In the “Title” field, enter the text you want displayed for the link. 6. Select whether the link should open in a new browser window. For links to external websites, it is recommended that you select New Window.
7. Click Insert. The link will appear underlined. After you have finished inserting the link, preview your content and click the link to test it.
|


| Expand | ||
|---|---|---|
| ||
Recent changes in browser security are causing problems in eLearning with Topic Links to external web sites. These resources are not opening for students as they once did. The easiest and best solution for this problem is to have the link open in a new window. We consider it a “Best Practice” to have sites external to eLearning always open in a new window. Please follow these simple steps to edit your links:
|


| Expand | ||
|---|---|---|
| ||
Creating accessible files is not as daunting a task as many believe it to be. These six steps will go a long way in making your content more accessible.
More InformationMore information on creating accessible content can be found on the ATC web site at: http://uwf.edu/offices/academic-technology-center/faculty-support-and-resources/accessibility/ Below are links to easy to follow instructions from WebAIM on making various documents accessible (pages will open in a new window). |
| Expand | ||
|---|---|---|
| ||
Symptoms
Cause
ResolutionInstructors/Content Publishers:
Students: In your Desire2Learn site, you can choose to allow blocked content to appear in order to view your course items: Mozilla Firefox
Google Chrome
Internet Explorer
|
FAQs - Discussions
| Expand | ||
|---|---|---|
| ||
To assess discussions using a rubric, we recommend:
Here’s how to use rubrics to assess Discussion posts: Add Rubric to Grade Item1. Click on [Grades] in the navigation bar. 2. Click on [Manage Grades]. 3. Click on the name of the grade item for your discussion assignment. 4. Under grading, click [Add Rubric].
5. Select the Rubric from the list, and click [Add Selected]. 6. Click [Save]. Link Discussion Topic to Grade Item7. Click [Discussions] in the main navigation bar. 8. Find the Topic you wish to assess. Beside the title of the Topic, click the [small inverted triangle] to reveal the dropdown menu. 9. Click [Edit Topic] in the dropdown menu. 10. Click the [Assessment] tab. 11. Click the dropdown menu under “Grade Item” to select the appropriate grade item to be linked to the Topic.
12. Type the number of possible points in the “Score out of” field. 13. Click [Save and Close]. Assess Discussion Posts and Enter Grade14. Click [Grades] in the main navigation bar. 15. Click on the small inverted triangle beside the appropriate grade item. 16. Choose [Grade All] in the dropdown menu.
17. Click the colorful icon in the [Submission] column to read any student’s aggregated posts in the linked Topic. 18. Click the yellow ruler icon under the [Assessment] column to score the rubric. 19. Manually enter the score into the [Grade] column — scoring the rubric will NOT automatically enter the grade. 20. You may choose to leave comments in the [Feedback] column. After you score the rubrics, students will be able to view them when they go into their gradebook. |


FAQs - Dropbox
| Expand | ||||||||||
|---|---|---|---|---|---|---|---|---|---|---|
| ||||||||||
You can upload the following types of files into a dropbox:
Restricted file extensions Important: Due to the large number of file extensions in usage, you may encounter additional restricted file extensions not listed in the table below. The following file extensions are not supported by D2L Brightspace: Restricted Upload Extensions ASP ASHX JSL VB ASPX ASMX LICX VBPROJ EXE AXD REM VJSPROJ BAT CDX RESOURCES VSDISCO DLL CER RESX WEBINFO COM CONFIG SHTM INI ASA IDC SHTML ASAX CS SOAP ASCX CSPROJ STM |
FAQs - Gradebook
| Expand | ||
|---|---|---|
| ||
The grade book will revert to the default setting of "Points" when copied over. To reset the grade option to the "Weighted" system:
Your grade book will now calculate using the weighted system. |
| Expand | ||
|---|---|---|
| ||
In the D2L gradebook, it is possible to create a Calculated grade item that will display to students their midterm grades. Note: Calculated grade items cannot belong to a grade category nor can they contribute to final grades. In Grades, choose Manage Grades:
|
FAQs - Navigation/Menu Tools
| Expand | ||
|---|---|---|
| ||
If You do not intend to respond to pages from your students, we recommend that:
To remove the Pager or any other Menu Tool:
It may take awhile for the Pager icon or tool to disappear, but it will eventually, usually when you log back into your course. |
FAQs - Respondus Assessment Tool
| Expand | ||
|---|---|---|
| ||
You can find the Respondus Password in the Software Downloads in MyUWF:
|
FAQs - Respondus Monitor
| Expand | ||
|---|---|---|
| ||
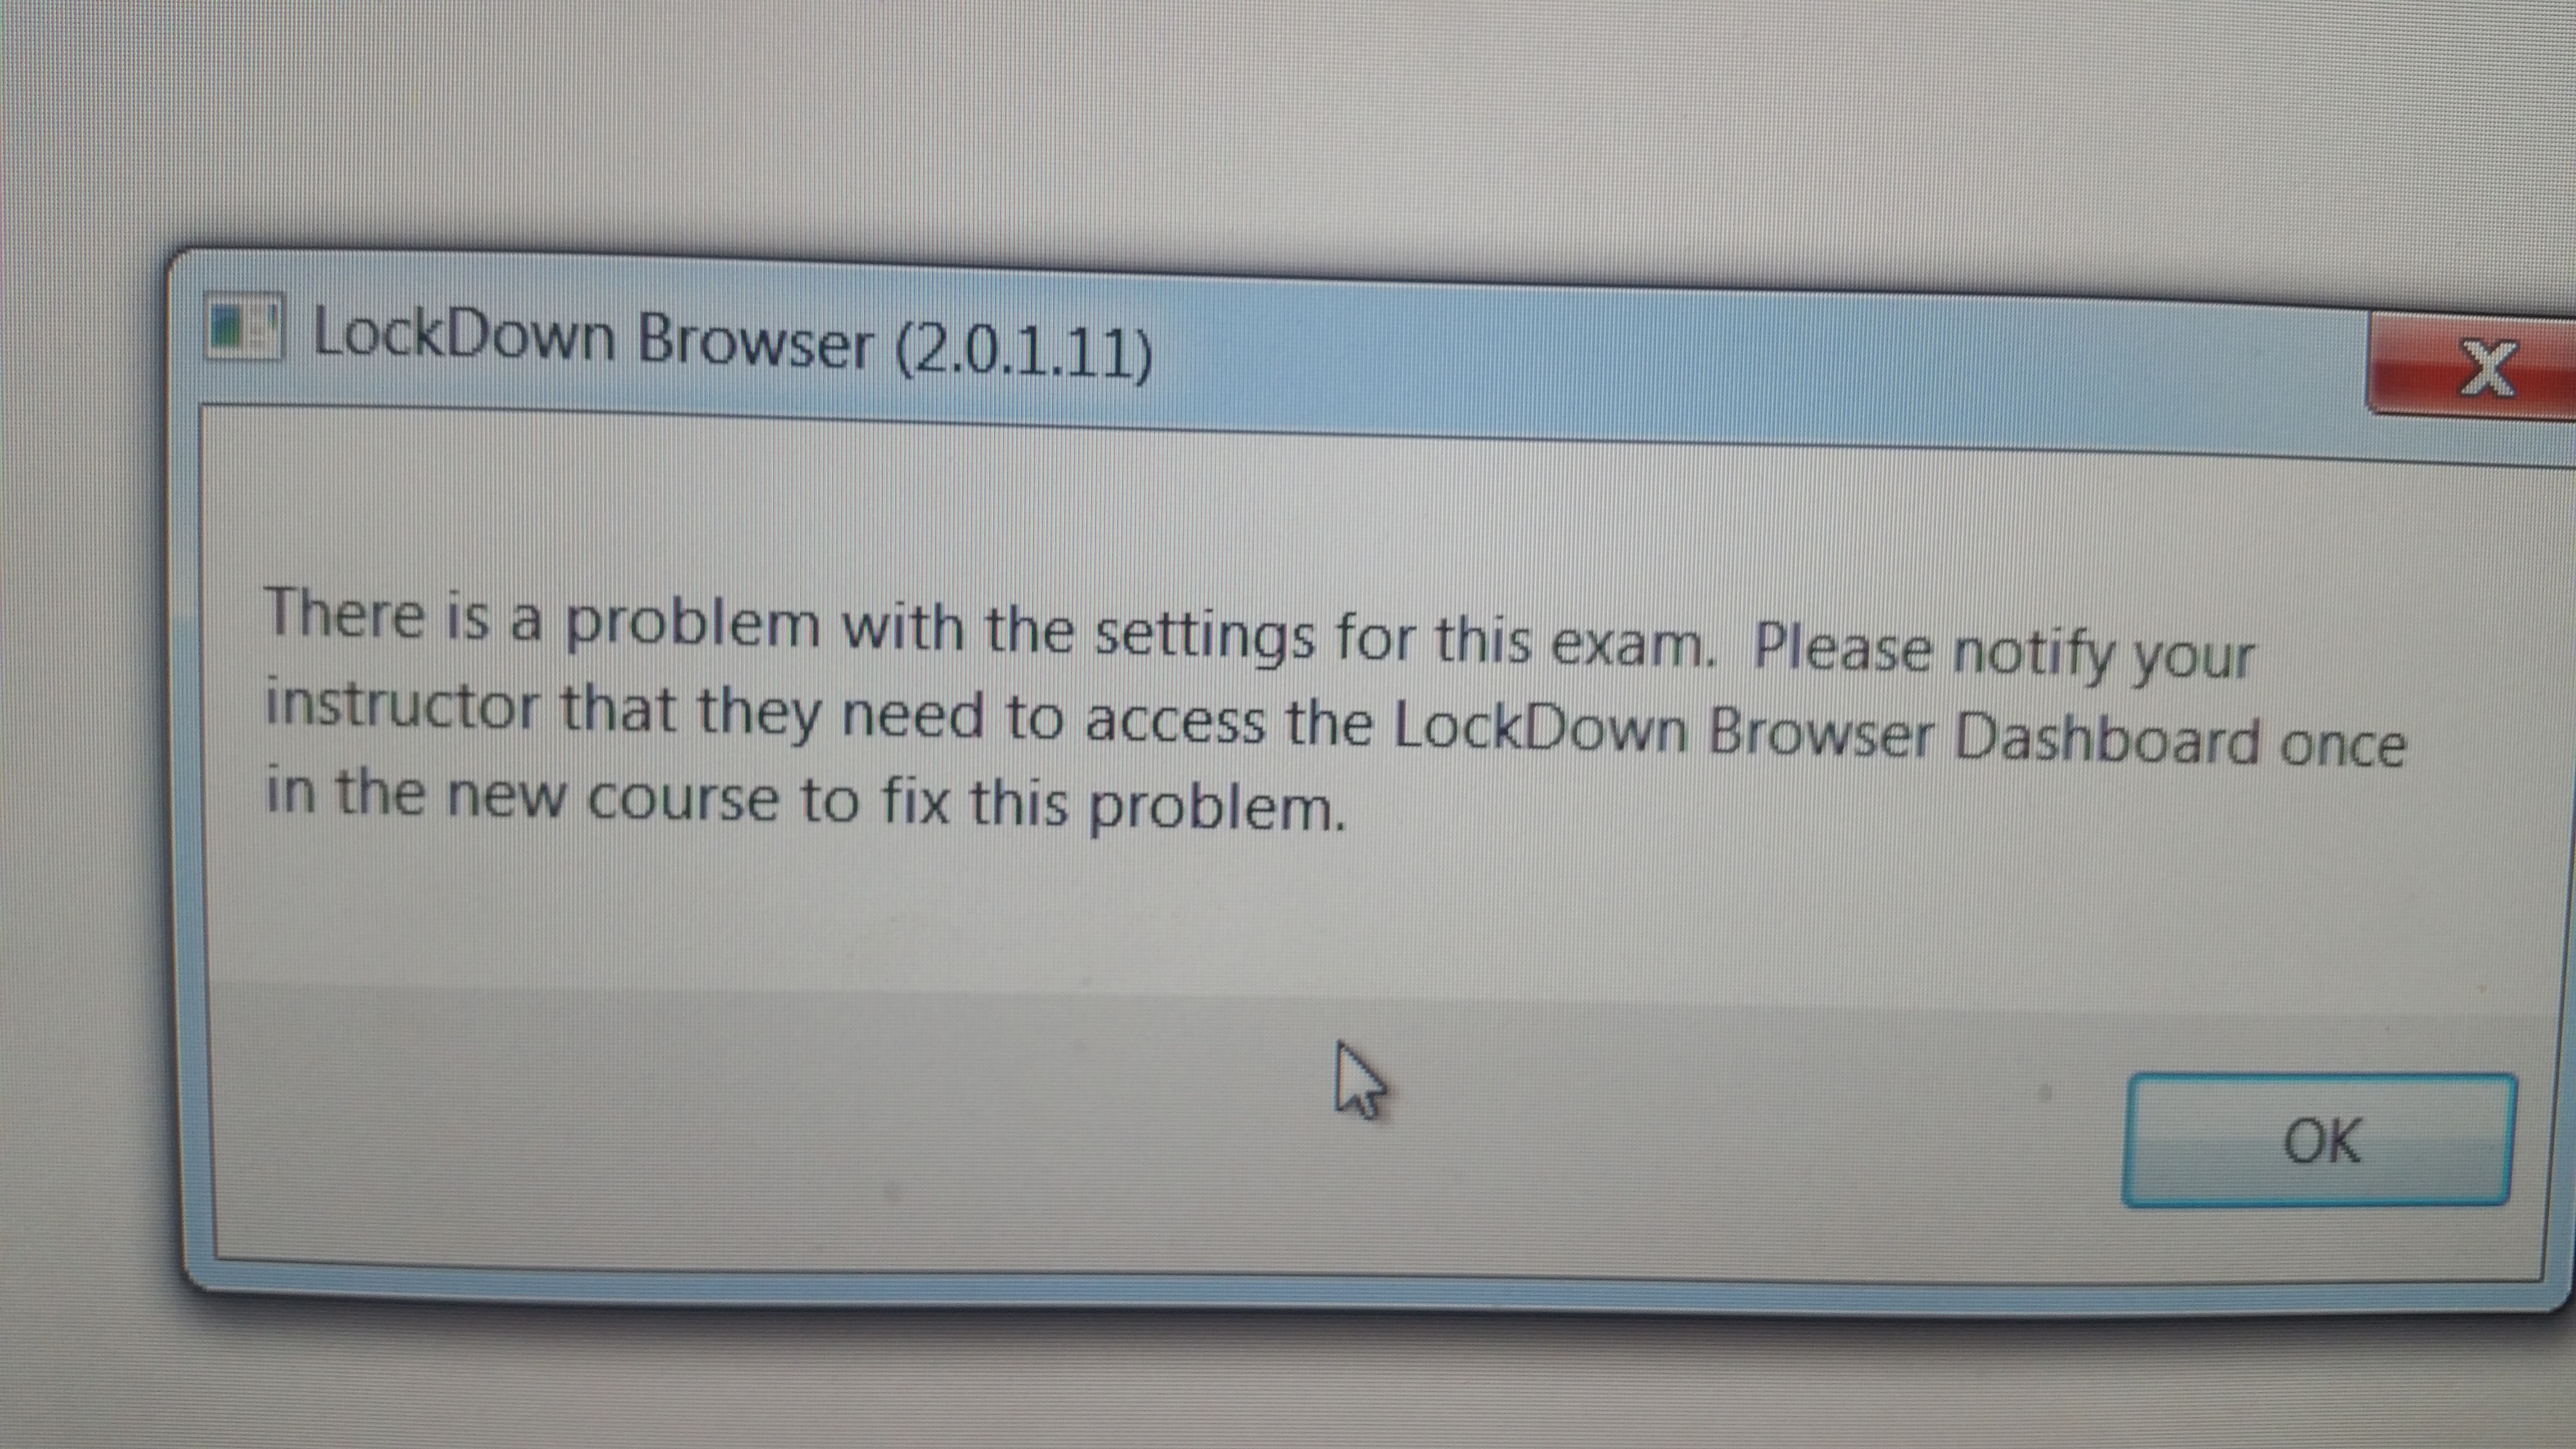
If your students receive an error message (like the image below) that there is a problem with the settings for an exam that requires the LockDown Browser and Monitor, the instructor needs to login to the course and access the LockDown Browser Dashboard once in a new course to fix the problem.
|
| Expand | ||
|---|---|---|
| ||
Sometimes if there is no text in the "Submission Views" "Messages" area, the quiz won't show up in the Respondus Dashboard. The instructor can go into the course and add a space with the space bar and the quiz will show up. Here is the info on the issue: http://bit.ly/2nAR88P |
FAQs - Syllabus
| Expand | ||
|---|---|---|
| ||
Follow this link for instructions (may require a login): https://confluence.uwf.edu/x/9ie8 |
FAQs - Quizzes
| Expand | ||
|---|---|---|
| ||
Steps for Regrading All Attempts for a Quiz Question1. Select Quizzes from the top navigation bar in the D2L course 2. Select Grade from the drop-down menu next to the quiz in which the question needs to be regraded 3. Select the Questions tab 4. Next, to regrade all attempts for a particular question, select Update All Attempts
5. Now scroll down to the question and click on the question. A new screen will open showing the question and questions statistics. 6. Scroll down to the Grade heading and re-score accordingly: 7. Click Save before exiting out of the screen. |
| Expand | ||
|---|---|---|
| ||
|
| Include Page | ||||
|---|---|---|---|---|
|
| Content by Label | ||||||||||||
|---|---|---|---|---|---|---|---|---|---|---|---|---|
|