...
| Excerpt |
|---|
The Respondus Test Generator is a tool that faculty can download from the Software icon in the Instructor Resources folder in MyUWFConfluence. This tool enables faculty to convert exams from a text format to an eLearning format for uploading. Faculty can also manage and print exams for classroom use. The Respondus Test Generator will also support or convert many publisher test banks for uploading into eLearning. |
Instructions
| Table of Contents |
|---|
Step 1
Downloading Respondus 4.0
- Enter MyUWF, locate the Software tab in the Instructor Resources folder or type Software in the search field. Click on the Software icon and select the Software Downloads link, scroll to Respondus Assessment Tool, and select it (you may have to re-enter your username and password).
- First, watch the Demo!
- Open and print the file: RS4_Installation_Instructions.txt (you WILL need it).
- Follow the instructions.
- Select Download Now. Select the save option and save the file to your desktop. A zipped file (RS4_Download.zip) will appear on your desktop.
- Unzip the file.
Step 2
Understanding the Respondus 4.0 Start Menu
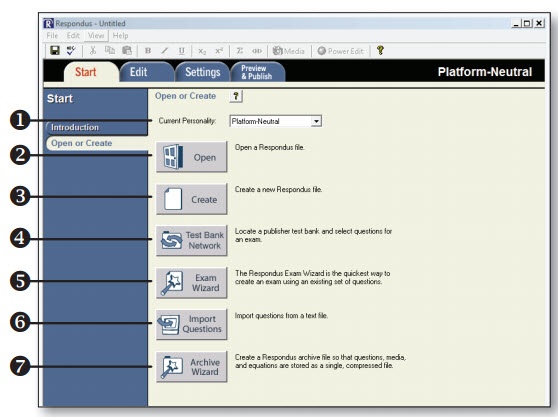
1 - Personality - select the course management system being used with Respondus.
2 - Open - open an existing Respondus file.
3 - Create - create a new file.
4 - Test Bank Network - locate a publisher test bank and select questions for an exam.
5 - Exam Wizard - create a new exam by copying questions from other Respondus fi les.
6 - Import Questions - import questions from MS Word, Rich Text, QTI and other formats.
7 - Archive Wizard - create a zip archive of a Respondus file,including all pictures and media.
Step 3
Using the Edit Menu
Use the Edit menu to create or edit questions.
1. Select a question type from the tabs along the left.
2. Enter the question text in the question template.
3. Add formatting to the question text using the toolbar options.
4. Specify the correct answer (if applicable) and the point value.
5. Click the Preview butt on to preview the question.
6. When ready, click the Add to End of List or Insert into List button.
7. The question will appear in the Question List at the bottom of the screen.
FAQs
...
| title | Enter question here |
|---|
Pages on this topic
| Page Tree | ||
|---|---|---|
|
Printing an Exam
- From the Preview & Publish menu, select the Print Options tab.
- Select an option: Exam or Exam with Answer Key or Answer Key only. Click the Settings button to the right to further adjust the settings.
- Click the Edit Headers button to modify the text that will appear at the top of each page.
- To print multiple variations of the exam (with randomized question orders in each), change the pull-down list to the desired number of exam variations.
- Click the Print Preview button to display the exam output in a window.
- Click the Save to File button to save the exam to MS Word, Rich Text Format or Text format. Or, click the Send to Printer button to print the exam directly.
...