Overview
...
Whether you are a new student, returning student, faculty member, staff member, or alumni, you need to activate your MyUWF/ArgoNet account prior to accessing MyUWF.
Active students and employees need to activate their ArgoNet accounts. Faculty, staff, and student ArgoNet accounts include access to services such as UWF Gmail accounts, ArgoAir, and eLearning.
The process for activating MyUWF and ArgoNet accounts is the same.
Instructions
| Warning | ||
|---|---|---|
| ||
Do not use it for such things as signing on to personal cloud services, paying bills or anything that would require access to the account after you are no longer a student or employee. |
Step 1
Go to my.uwf.edu and and click 'Activate your account'.


Step 2
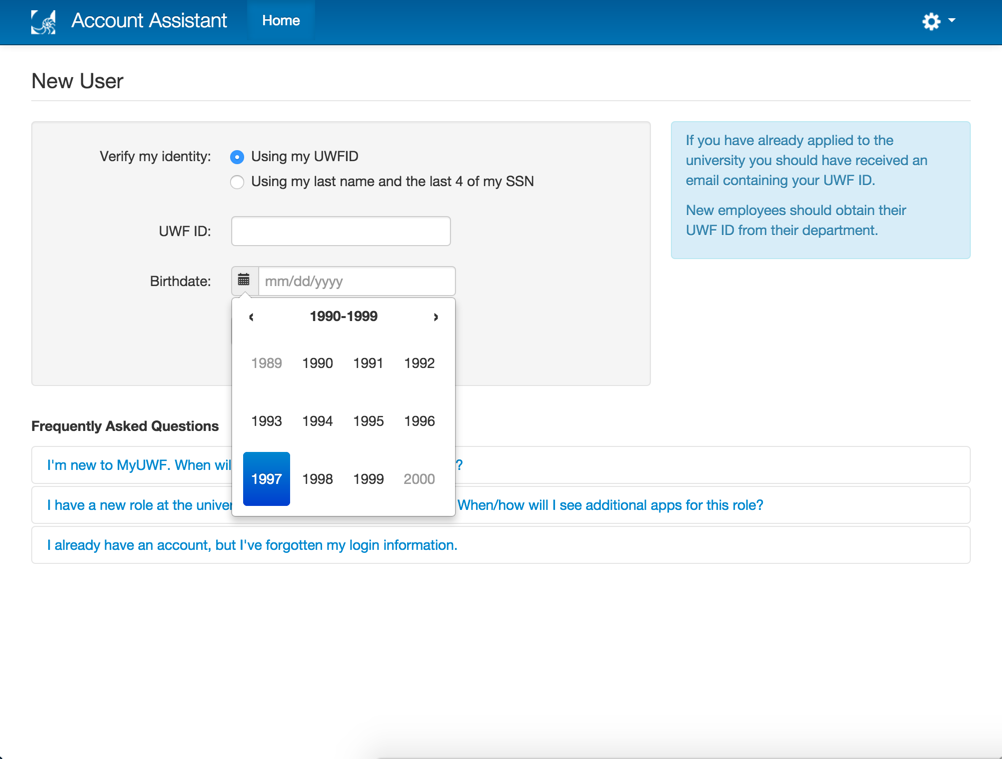
Choose one of the two options to verify your identity.
- If you selected the 'Using my UWFID' option, fill in your UWF ID and birth date.
- If you selected the 'Using my last name and the last 4 of my SSN' option, fill in your last name, the last 4 digits of your SSN, and your birth date.
To minimize issues with formatting your birth date, use the calendar tool to the left of the birth date field.
Step 3
Choose three different security questions and provide an answer for each.
Your answers are not case sensitive. Please be aware that all other formatting (spacing, special characters, spelling, etc.) must match exactly if you are prompted to answer your security questions in the future.
You may only use the 'Enter your own question' option once.
Step 4 (Steps 4, 5, & 6 will only apply to students, applicants, and alumni. Faculty and Staff may continue to Step 7)
Provide an external (non-UWF) email address in both fields and press the 'Next' button.
Some .edu or .mil email addresses may filter emails from UWF. To avoid this issue, utilize a common email provider (Gmail, Yahoo, Hotmail, iCloud, etc).
After pressing the 'Next' button, a verification email will be sent to your external email address.
Step 5
Navigate to the inbox of the non-UWF email account that you provided, and click the link within the verification email to continue the account activation process.
The link within this email is only active for 4 hours. If you click the link after this time period, you will receive an external email verification error.
Step 6
After your external email address has been confirmed, click the 'Next' button to continue and choose a new password.
If you receive an external email verification error, you will need to clear your cache (Chrome instructions; Firefox instructions), then go back to step 1 above and restart the activation process.
If you receive the same email verification error after clearing your cache and restarting the activation process, please call the ITS Help Desk (850.474.2075) during our business hours. Please be sure to be on your personal network and in front of a personally owned Windows or Mac computer when you call.
Step 7
Follow the directions given in the "Activate Your Account" step requesting your personal information.

You will be asked to provide your last name and birth date to confirm your identity.

Step 3
After confirming your identity we will locate your username to activate. If successful, click "Activate Account" to proceed to through the activation process (proceed to Step 4).

| Info | ||
|---|---|---|
| ||
In rare cases, multiple accounts may be available for activation. Select one and proceed to Step 4.
|

If we cannot confirm your identity you will be allowed to review the information you provided in previous steps and try again.

| Note | ||
|---|---|---|
| ||
In all cases, please call the ITS Help Desk at (850) 474‑2075 for further assistance activating your account. |
Step 4
If you are a student, faculty/staff, applicant, or alumni, a prompt will require you to enter an external email address once you have reached the 'Email' step of the account activation.

After this it will prompt you for a mobile number, which can be skipped if necessary

Other users will proceed to Step 5.
Step 5
Select one of the following password options when prompted:
...
- 'Use a randomly generated system password'
...
- 'Generate a new password'
...
- 'Create my own password'
...
If you have selected the 'Use a randomly generated system password' option, you will be provided with a random password on the screen. It is important to make a note or remember your password. This will be the last time it is displayed.
Click the 'Next' button to continue.

If you have selected the 'Create my own password' option, provide a new password in both fields.
...
- UWF requires that ArgoNet passwords abide by the following criteria:
From 14 to 20 characters in length.
Must start with a letter.
Have at least one integer (0 - 9) or
- UWF requires that ArgoNet passwords abide by the following criteria:
...
one of the following special characters: !%^*

Step 6
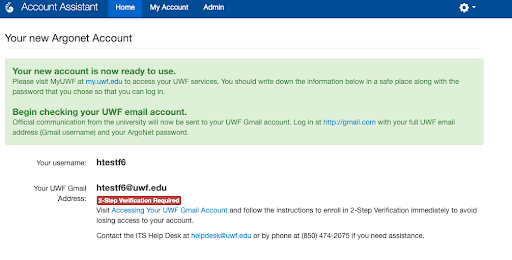
If the account activation was successful, you will see the following advisory message.
Keep in mind that you will only see the red text advising you to enroll in 2-step verification if you are upgrading your account to an ArgoNet account.
| Note |
|---|
After the account has been activated, be sure to follow the directions given carefully. Failing to do so may result in loss of account access. |

If account activation fails, you will see one of the error screens shown below. Please contact the ITS Help Desk if you encounter any issues during the activation process.


Click the 'Next' button to continue.

Step 8
You will be directed to the following screen. Please do not close this screen as your new username will be presented to you shortly.
Step 9
Go to my.uwf.edu, click 'Log in', type in your new username and password, and click 'Log In'.
...
| title | After confirming you can log in to MyUWF, you may want to log out, wait 30 minutes, and log back in. |
|---|
...
| Include Page | ||||
|---|---|---|---|---|
|