Overview
| Excerpt |
|---|
This article outlines the process for adding Google Auth 2.0 to a survey in Qualtrics. This method can be used to capture email addresses of users who complete a Qualtrics surveyaddress or restrict surveys to either facstaff or students. |
| Warning | ||
|---|---|---|
| ||
Certifications Qualtrics form builders must configure their certifications within SCOOP for CAS authentication beforehand. Also know that the steps below CANNOT track must be set up by CAS Authentication. The steps below will NOT record users completion within SCOOP. |
Instructions
Go to the [Edit Survey] tab for the survey you want to add authentication.
Step 1
Click the Survey Flow button at the top of the screen.
Step 2
Click the "Add a New Element Here" text on the next screen.

Step 3
Choose the Authenticator option.

Step 4
Enter the following settings into the Authenticator options.
- Authentication Type: SSO
- Checkmark: Capture respondent identifying info
All paramater fields from "Field From SSO" text must be formatted as followed:
- emailAddress = UserName
- SSO Type: Google OAuth 2.0

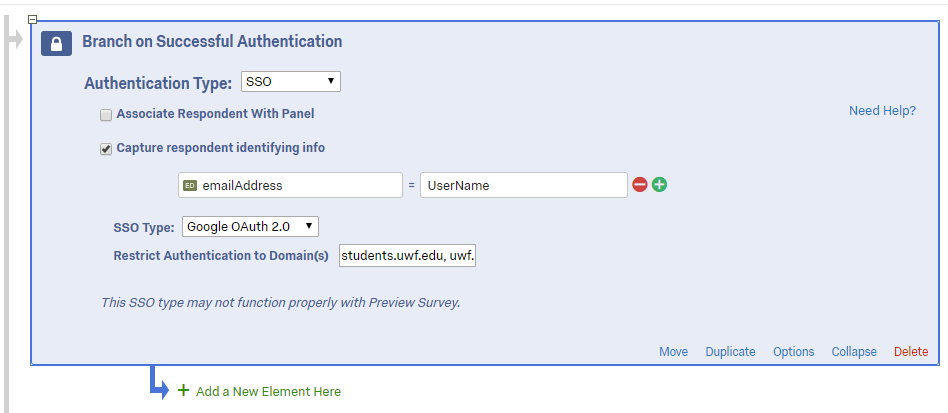
Step 5
For Restrict Authentication to Domain(s) you may enter the following to restrict who can complete the survey:
- Only facstaff: uwf.edu
- Only students: students.uwf.edu
- Only students and facstaff with UWF: uwf.edu, students.uwf.edu
- All users including outside of UWF: leave the box blank
Step 6
Use the "Move" option on each of your survey blocks to click and drag each block under the new Authenticator area. This will ensure that no parts of the survey will be accessible until the respondent logs in first.

Step
67
Click Save Flow in the bottom right corner to save your settings.
Step
78 (Optional)
After completing these steps, if you would like to view the UWFID in the results, complete the following:
- Click the Data & Analysis tab.

- Click Tools towards the right of the screen.
- Select Choose Columns.
- Click Embedded Data.
- Check emailAddress for email address of user.
Previous/Next Steps
(Enter text here)
Contributors
Interested Parties| Panel | ||||||||||
|---|---|---|---|---|---|---|---|---|---|---|
| ||||||||||
|
| Expand | ||||||||||||||||||
|---|---|---|---|---|---|---|---|---|---|---|---|---|---|---|---|---|---|---|
| ||||||||||||||||||
|